Part 1 of this series introduced static apps deployment using the DivShot hosting service. In this 2nd article, let's see how to go further with automated continuous deployments. The solution I've decided to use for this is Wercker, combined with Github and DivShot. As an alternative to Wercker, one could choose Travis CI, though I've not tested it yet.
To get to know more about Wercker, start with the introduction here.
Preparing your code
As preliminary requirements, make sure you create a repository for the code of the application on Github,
and update your code by adding a package.json file to your project directory, following NodeJS packaging standards.
{
  "name" : "examplesite",
  "version" : "1.0.0",
  "dependencies": []
}
This is actually the minimum, since we do not have anything special to do on the code itself. At least not in this first experiment. But we will be relying on the divshot CLI, which is a NodeJS program, to deploy the code.
Preparing the wercker.yml file for build and deployment steps
Next important thing is to add a file called wercker.yml to the root of the project, in which we will add
instructions needed to build and deploy via Wercker services.
The first line in the .yml file is needed so that Wercker can use a NodeJS environment, since we will have to install npm, needed to install the divshot CLI.
# A NodeJS box so we can use npm
box: wercker/nodejs
Second, we add the build definition lines, where in my case, we instruct to execute the NPM installation steps, and then return the versions of Node and NPM installed for confirmation purpose.
# Build definition
build:
  # The steps that will be executed on build
  steps:
    # A step that executes `npm install` command
    - npm-install
    # A step that executes `npm test` command
    - npm-test

    # A custom script step, name value is used in the UI
    # and the code value contains the command that get executed
    - script:
        name: echo nodejs information
        code: |
          echo "node version $(node -v) running"
          echo "npm version $(npm -v) running"
Then we need a specifications block for the deployment to the Divshot server. We use a custom script-based step to install
the divshot CLI and then push the code to the deployment target (which is development, staging or production),
and using your Divshot token. We will see in a few minutes how you setup both values via Wercker's dashboard.
# Pushing to Divshot host
deploy:
  # The steps that will be executed
  steps:
    - script:
        name: deploy to divshot.io
        code: |
          sudo npm install -g divshot-cli
          divshot push $WERCKER_DEPLOYTARGET_NAME --token $DIVSHOT_TOKEN
Remember to commit your new files to the repository and push them to Github.
Connecting the Github repository, Wercker and DivShot
Let's now go to Wercker.com to continue the setup. After signing in using your Github account, you will find the menu action for adding a new application. Select Github as your Git provider, select the right repository from the list provided, and click on "Use selected repo" button.
The configure access to the repository for deployments, by adding a deploy key. If you are using a private repository without submodules (which is generally my case), choose the recommended option i.e. "Add the deploy key to the selected repository for me". If you immediately check that repository's settings on github, under the "Deploy keys" tab, you will see an entry was just added by Wercker.
Final step here is to add the wercker.yml file to the repository (they actually generate the first part of the file for you), but we anticipated this an already and we already got the required file in our repository.
Testing what we've already got
To test this workflow, compile your static site (using a Jekyll site as an example), and then commit and push the changes to github.
jekyll build
...

git status
...

git add _posts/my-new-post.md
git add _site/2014/12/23/my-new-post
git commit -a -m "New post added."
git push origin master
At this point, check on the Wercker application interface, and you will see the build steps being executed, after Wercker has been notified by Github of the commit event. If the build fails, you will have to check things, debug, and if needed you can contact the Wercker team for support. Otherwise, next thing is to make the deployment part work.
Setting the deployment target on Wercker
To do the deployment part, we still need to set something called the deploy target. From the application interface in the Wercker dashboard, go to the Settings tab, and scroll down to the Deploy targets part of the page. Alternatively, you can quickly reach that part of the interface, using the shortcut link in the right menu.
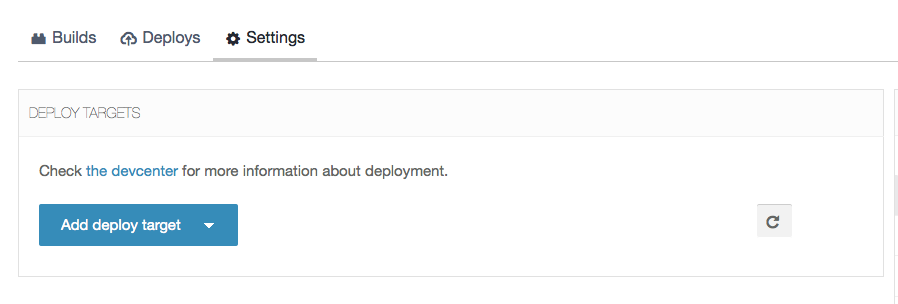
Click on Add deploy target, and select Custom deploy, and fill the form starting with the name of the deploy target,
which should take the value development, staging, or production. Let's say we are deploying to production right away.
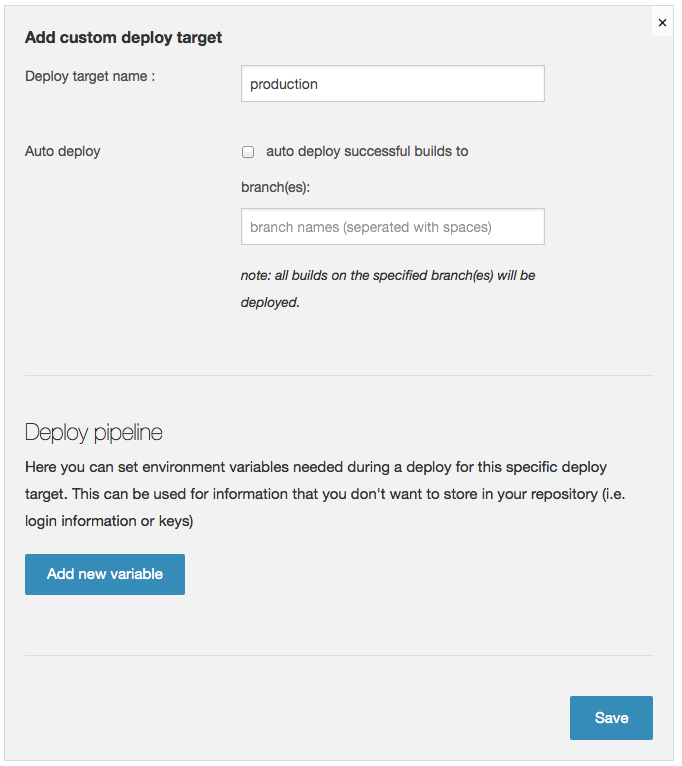
As you may have noted, that deploy target name is the setting used, via the WERCKER_DEPLOYTARGET_NAME reference,
in the deploy step defined in the wercker.yml we added to the code repository.
What about the Auto deploy setting? Once things work fine, and you are confident with your deployment process, you can come back
and enable that option.
Finally, you need to set the DIVSHOT_TOKEN variable to your divshot API key.
Under Deploy pipeline, use the Add variable button to display the form for that, and enter DIVSHOT_TOKEN
for the Environment variable setting.
Now you need the token value to fill in. Get it immediately using the DivShot command line tool on your computer, after login in:
$ divshot login
...
$ divshot auth:token
The token will be printed in the terminal for you. Copy and paste it in the right field in the form as
the text value for DIVSHOT_TOKEN.
Complete this step by enabling the Protected option, and save the form.
Deploying to DivShot
To test the deployment action, go back to the Builds tab of the application interface, click on the entry for the latest build passed for your code. You will see the page with details reported for that build.
Click on the "Deploy to" dropdown menu button, located in the upper right corner of the page, and then choose "production" listed as your target option. You are shown a confirmation window where you can adjust the action's log message and then confirm to start deploying.
If all goes well, the deployment is completed a few minutes later, and you site is updated.


